
This is the fourth of a series on taking up residence on a new server. In our last post we talked about how to set up some basic network services like ssh and configure iptables, our firewall. In this post we'll talk about making your server feel like home.
There are a grand number of things we can do at this point to make our time on the machine enjoyable. Take time to evaluate your choices though. This 'root' host is going to be our 'control seat' so it's not going to be doing much more than orcestrating virtualized environments. Once we configure these environments (next post) we'll be using these for any sort of development, deployment, or experiments.
With 'root' our goal is to make a simple set of good, sharp tools to do what we need to do. These are tools like nvim which we installed earlier. If you were following the last host you may have installed mosh as well, which makes our ssh sessions safe from network changes and comfortable against latency.
After installing a few more tools we'll discuss configuration of our tools while we overview their functionality and purposes.
Aside: The User Skeleton
In /etc/skel you can find the file structure created for a new user. If a user hoverbear is created then everything in /etc/skel is copied into /home/hoverbear (or wherever that user's home directory is).
On our 'root' we won't be utilizing this, since we will be the only users (your user and root which is also you). Instead we'll just be modifying the system-wide defaults, this way if we end up acting as the root user or something we'll still have the same configuration.
The Shell
The prompt you've been typing all these commands at is your shell. There are lots of different shells, this one is bash. I've enjoyed using zsh and fish before as well. Since this is our 'root' we're just going to stick with the built-in defaults, we can choose a fancy shell to load with lots of sketchy plugins in our less privileged container!
bash looks for configuration in /etc/bash.bashrc which is overridden by ~/.bashrc. We'll remove these user specific files then edit the system-wide file.
rm ~/.bashrc
sudo rm /root/.bashrc
vim /etc/bash.bashrc
Below I've included a commented configuration to explain many settings.
#
# /etc/bash.bashrc
#

# If not running interactively, don't do anything.
[[ $- != *i* ]] && return

# Use extra globing features. See man bash, search extglob.
shopt -s extglob
# Include .files when globbing.
shopt -s dotglob
# When a glob expands to nothing, make it an empty string instead of the literal characters.
shopt -s nullglob
# A command name that is the name of a directory is executed as if it were the argument to the cd command.
shopt -s autocd
# Let bash update the window size if we resize it.
shopt -s checkwinsize

# This is what you see between every command.
# Make your own at http://bashrcgenerator.com/
PS1="\[\033[38;5;10m\]\u\[$(tput sgr0)\]\[\033[38;5;7m\]@\[$(tput sgr0)\]\[\033[38;5;9m\]\H\[$(tput sgr0)\]\[\033[38;5;12m\]\w\[$(tput sgr0)\]\[\033[38;5;3m\] $(systemctl is-system-running) \[\033[38;5;15m\]\[$(tput bold)\]\$?\[$(tput sgr0)\] \n\[$(tput sgr0)\]\[\033[38;5;7m\]\t\[$(tput sgr0)\]\[\033[38;5;15m\] \[$(tput bold)\]\\$\[$(tput sgr0)\] "
# The rest can really just be left default.
PS2='> '
PS3='> '
PS4='+ '

# Set up bash completion.
[ -r /usr/share/bash-completion/bash_completion   ] && . /usr/share/bash-completion/bash_completion

# This tells grep to use color when appropriate.
export GREP_OPTIONS='--color=auto'
# Configures the default editor, we installed nvim earlier.
export EDITOR='nvim'

# Get colors in ls by default
alias ls="ls --color=auto"
Now test it out by running bash, your prompt should change. If it looks good exit then exit again and reconnect. This configuration is by no means exotic or impressive, it's just some nice basics.
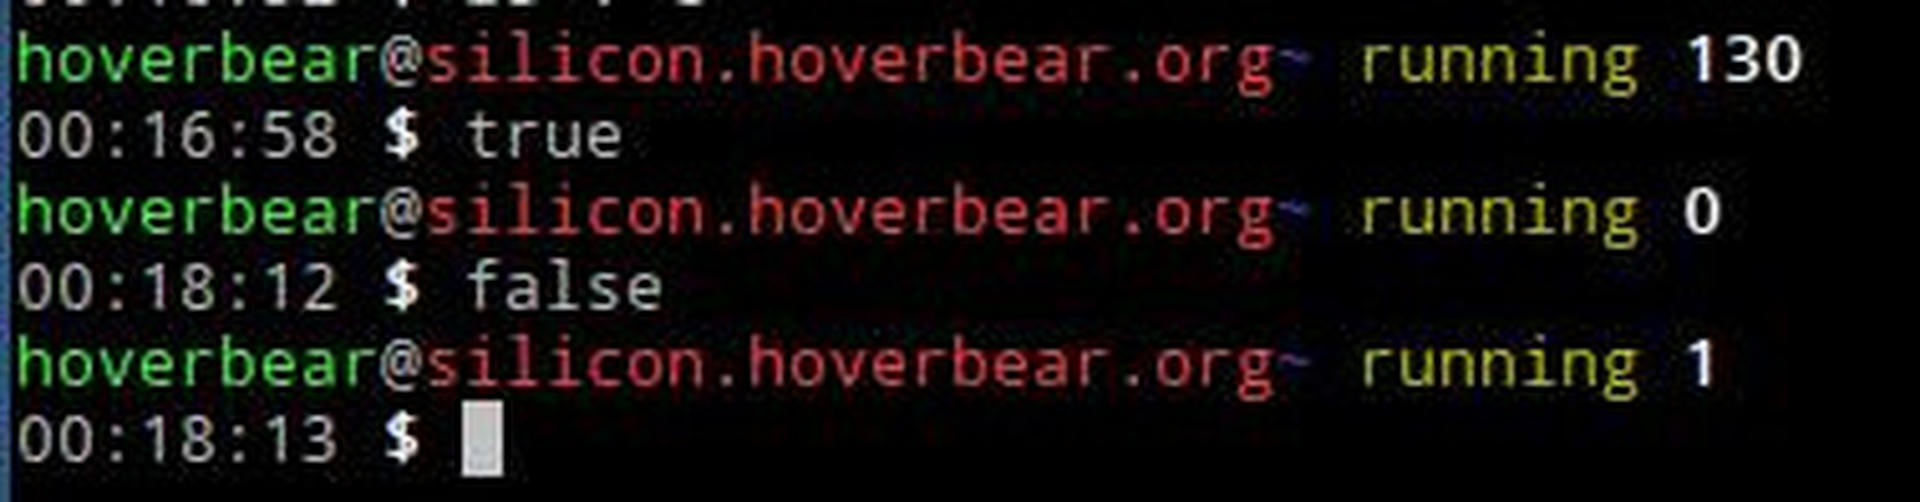
The prompt is intended to clearly communicate where, and who, you are, as well as the exit code. Time can sometimes be useful, so I included it as well. It's all also nicely color coded. Here's how it's structured:
user@full.domain.name/current/directory (system state) (last exit code)
(time) $
(system state) refers to the output of systemctl is-system-running which will output based on this list. In most cases it will either be running if everything is good, or degraded if some service has failed.
(last exit code) will be 0 if the last command exited successfully, and a different number if it did not.
The Multiplexer
Shell multiplexing is a great way to maintain a workspace on a remote machine. The idea is to have a daemon which holds onto your shell sessions for you and essentially acts as a 'window manager' for your various shell panes. You're then able to 'detach' and 'reattach' to these sessions whenever you want.
I'm aware of tmux and screen which both accomplish this quite well. I prefer tmux and we'll talk about setting up that one. You can find the wiki documentation here. You can get it with pacman:
pacman -S tmuxThe global configuration for tmux lives at /etc/tmux.conf and we can just configure a couple settings:
# Use a 256 color configuration.
set -g default-terminal "screen-256color"
# Start windows and panes at 1, not 0.
set -g base-index 1
set -g pane-base-index 1
# So the history doesn't go on forever.
set -g history-limit 10000
# Split panes using | and -, this makes more sense!
bind \ split-window -h
bind - split-window -v
unbind '"'
unbind %
# Don't rename windows automatically. Rename with Ctl+B followed by ,
set -g allow-rename off
###
# Theme below.
###
# Panes
set -g pane-border-bg colour235
set -g pane-border-fg colour238
set -g pane-active-border-bg colour236
set -g pane-active-border-fg colour10
# Messaging
set -g message-attr bold
set -g message-fg colour232
set -g message-bg colour166
set -g message-command-fg blue
set -g message-command-bg black
# Window mode
setw -g mode-bg colour6
setw -g mode-fg colour0
# Window status
setw -g window-status-current-fg colour10
setw -g window-status-current-bg colour238
setw -g window-status-current-attr bold
setw -g window-status-current-format ' #I#[fg=colour250]:#[fg=colour255]#W#[fg=colour10]#F '
setw -g window-status-fg colour138
setw -g window-status-bg colour235
setw -g window-status-attr none
setw -g window-status-format ' #I#[fg=colour237]:#[fg=colour250]#W#[fg=colour244]#F '
setw -g window-status-bell-attr bold
setw -g window-status-bell-fg colour255
setw -g window-status-bell-bg colour1
# Info on left
set -g status-left ''
# Modes
setw -g clock-mode-colour colour135
setw -g mode-attr bold
setw -g mode-fg colour196
setw -g mode-bg colour238
# The statusbar
set -g status-position bottom
set -g status-bg colour233
set -g status-fg colour137
set -g status-justify left
set -g status-interval 2
set -g status-attr dim
set -g status-left ''
set -g status-right '#[bgcolour=0]#[fg=colour10]#(echo $USER)#[fg=colour7]@#[fg=colour9]#(hostname) #[fg=colour3]#(systemctl is-system-running) '
set -g status-right-length 50
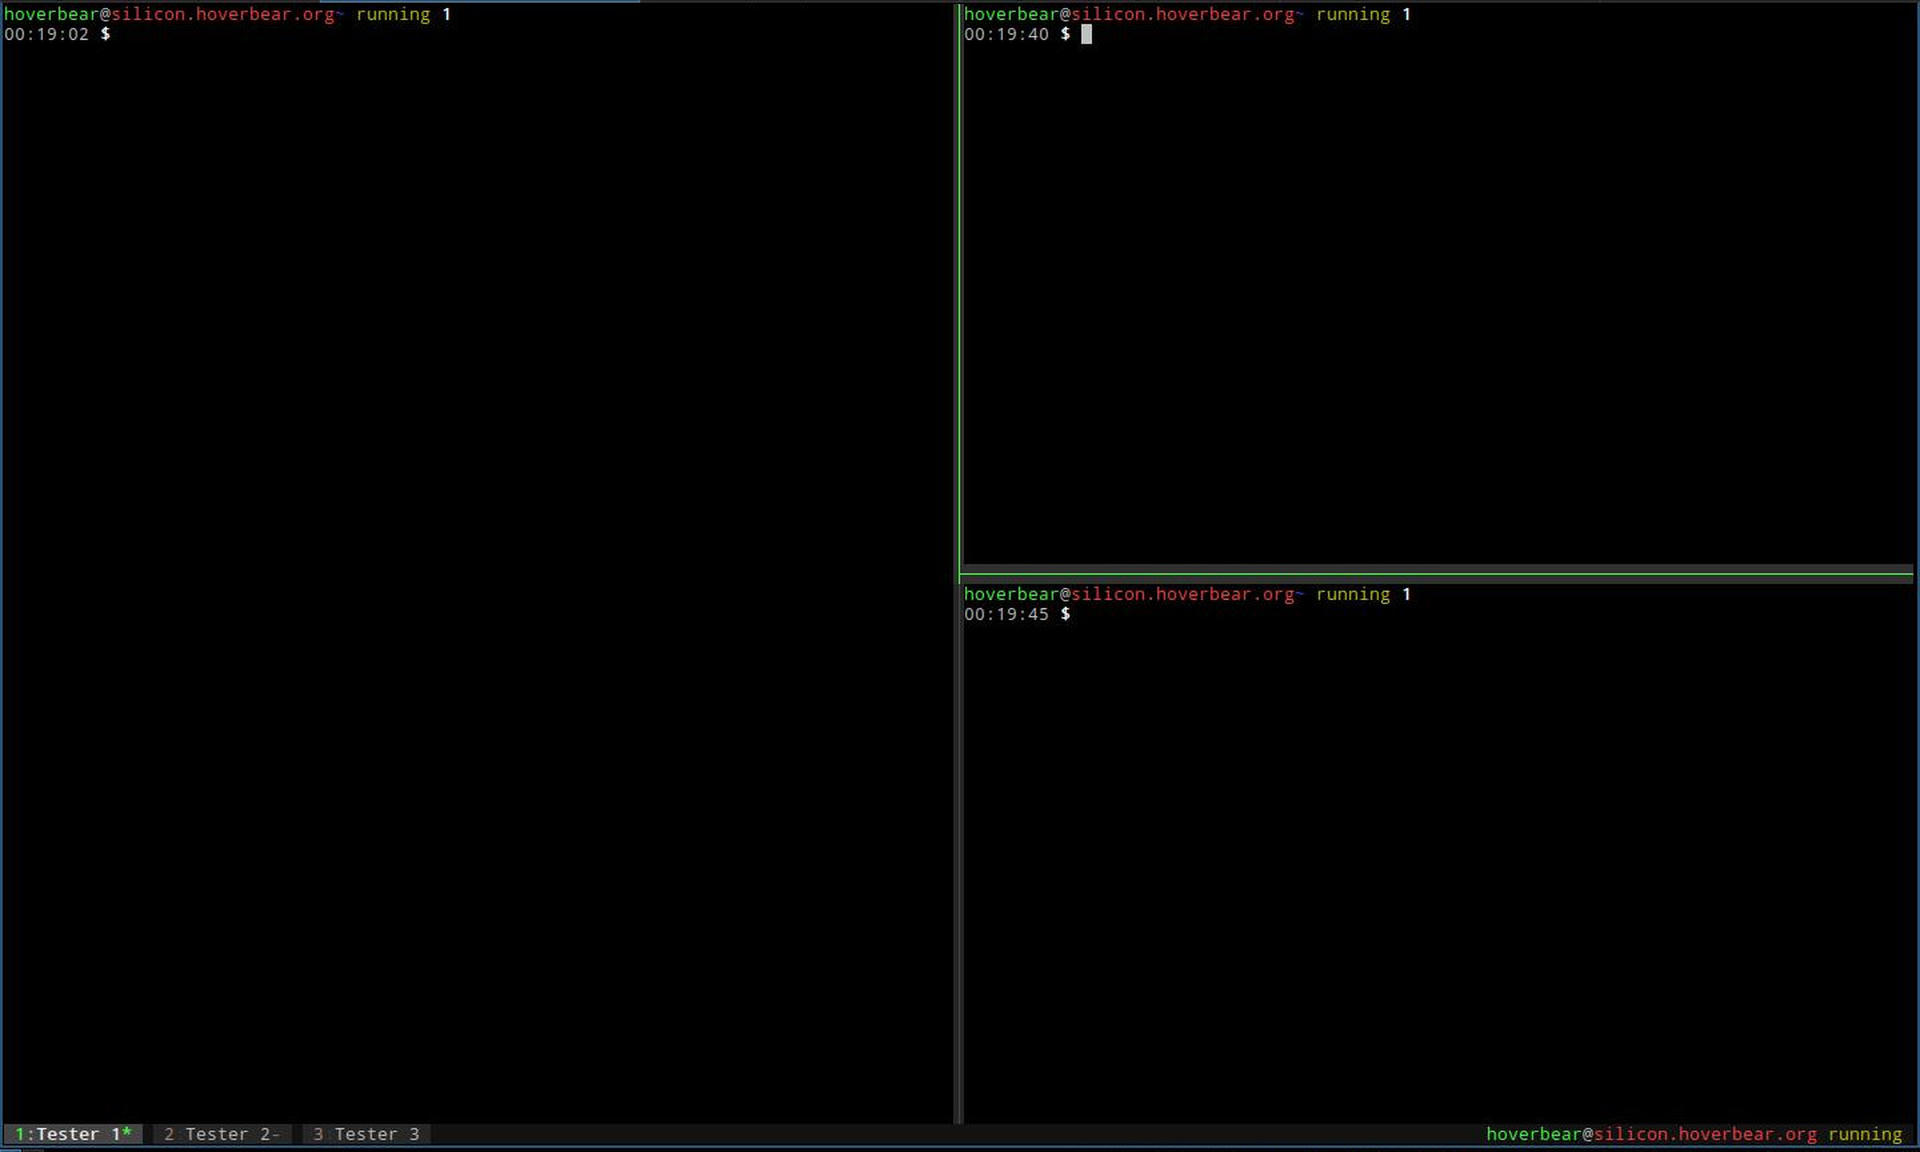
set -g status-left-length 20Launching tmux you can create new 'tabs' with Ctl+b c (press Control and b, then let go and press c). You can rename them with Ctl+b ,. You can split them with Ctl+\ and Ctl+- respectively. You can move between splits with Ctl+b left and Ctl+b right. With Ctl+b 1 or any number you can change 'tabs'.
You can detach tmux with Ctl+b d and you can re-attach with tmux a later on. Sessions will persist between logins but not between reboots.
Editing the Editor
Earlier we installed nvim with pacman -S neovim. Neovim is a minimal modern recreation of vim which itself was a recreation of vi. There are also editors like emacs, ed, and nano.
The nvim systemwide configuration is stored at /etc/xdg/nvim/init.vim, and you might need to create the folder with mkdir -p /etc/xdg/nvim/.
Inside we can do some basic configuration:
" Be improved
set nocompatible

" General
set number      " Show line numbers
set history=700 " Commands
set autoread
set magic       " Regex related
set showmatch   " Brackets
set mouse=a     " Enable all mouse interaction.
filetype plugin on
syntax enable
set ttyfast     " Improve smoothness
set lazyredraw  " Don't redraw while executing macros
set showcmd     " Show partially typed commands at the bottom
set wrap        " Soft wrap lines

" Indents
set expandtab
set smarttab
set shiftwidth=4
set tabstop=4
set ai " Auto Indent
set si " Smart Indent

" Peace and quiet
" (Side note: Vim does a 'bell' very often)
set noerrorbells
set novisualbell

" Searching
set ignorecase
set smartcase
set hlsearch
set incsearch

" Don't do some legacy-related things like temporary swapfiles.
set nobackup
set nowb
set noswapfile

" Tell vim to remember certain things when we exit
"  '10  :  marks will be remembered for up to 10 previously edited files
"  "100 :  will save up to 100 lines for each register
"  :20  :  up to 20 lines of command-line history will be remembered
"  %    :  saves and restores the buffer list
"  n... :  where to save the viminfo files
set viminfo='10,\"100,:20,%,n~/.viminfo

" Automagically restore files we were editing to the line we were on.
function! RestoreLine()
  if line("'\"") <= line("$")
    normal! g`"
    return 1
  endif
endfunction
augroup restoreLine
  autocmd!
  autocmd BufWinEnter * call RestoreLine()
augroup END

" Colorscheme
colorscheme spacegrey
Now we need to fetch the colorscheme, Spacegrey.
mkdir -p /etc/xdg/nvim/colors/
curl https://raw.githubusercontent.com/ajh17/Spacegray.vim/master/colors/spacegray.vim -o /etc/xdg/nvim/colors/spacegrey.vim
At this point nvim is quite capable of doing any task we might need of it. Triumph in this by telling the system you and it are officially in a relationship.
cat << EOF >> /etc/bash.bashrc

# Use nvim
export EDITOR=nvim
EOF
Final Steps
Since it's probably been a couple days since you started this process, it's also a good idea to update:
- Check the Arch Frontpage in case there is any news item you need to be aware of.
- Issue
pacman -Syu.
Before moving on it might be a good idea to make a snapshot of what we have so far, this way we can roll back. This is a very cool feature of BTRFS and one of the main reasons I use it. Since this is technically our / the process is a bit more involved than usual.
# First, mount the BTRFS volume somewhere plainly, no subvolume.
mount -o compress=lzo /dev/sda /mnt/
cd /mnt
# Create a read-only snapshot of `root` called `root-fresh`.
sudo btrfs subvolume snapshot -r root root-fresh
If you ever find yourself in a situation where you just need to restart all over again, this is a snapshot you can use so you don't have to re-do all your configuration and setup. You would just have to:
- Boot into recovery.
- Mount the filesystem with
mount -o compress=lzo /dev/sda /mnt/. btrfs subvolume delete /mnt/rootbtrfs subvolume snapshot /mnt/root-fresh /mnt/root
For now this will give you a way to return back to this exact point while we dork around with containers. You can also mount it (like the other subvolumes) and recover defaults in case something gets bungled in your current system.
In later posts we'll be discussing BTRFS more in regards to how it works with containers and backups.
Ready to Go
Try running our three configured programs as both root and your $USER, their configurations should be the same. Our system has been configured to act in a simple, usable manner and behave with little surprising behaivor. Below you can see it with nvim /etc/iptables/iptables.rules, systemd-cgtop and journalctl -f running.
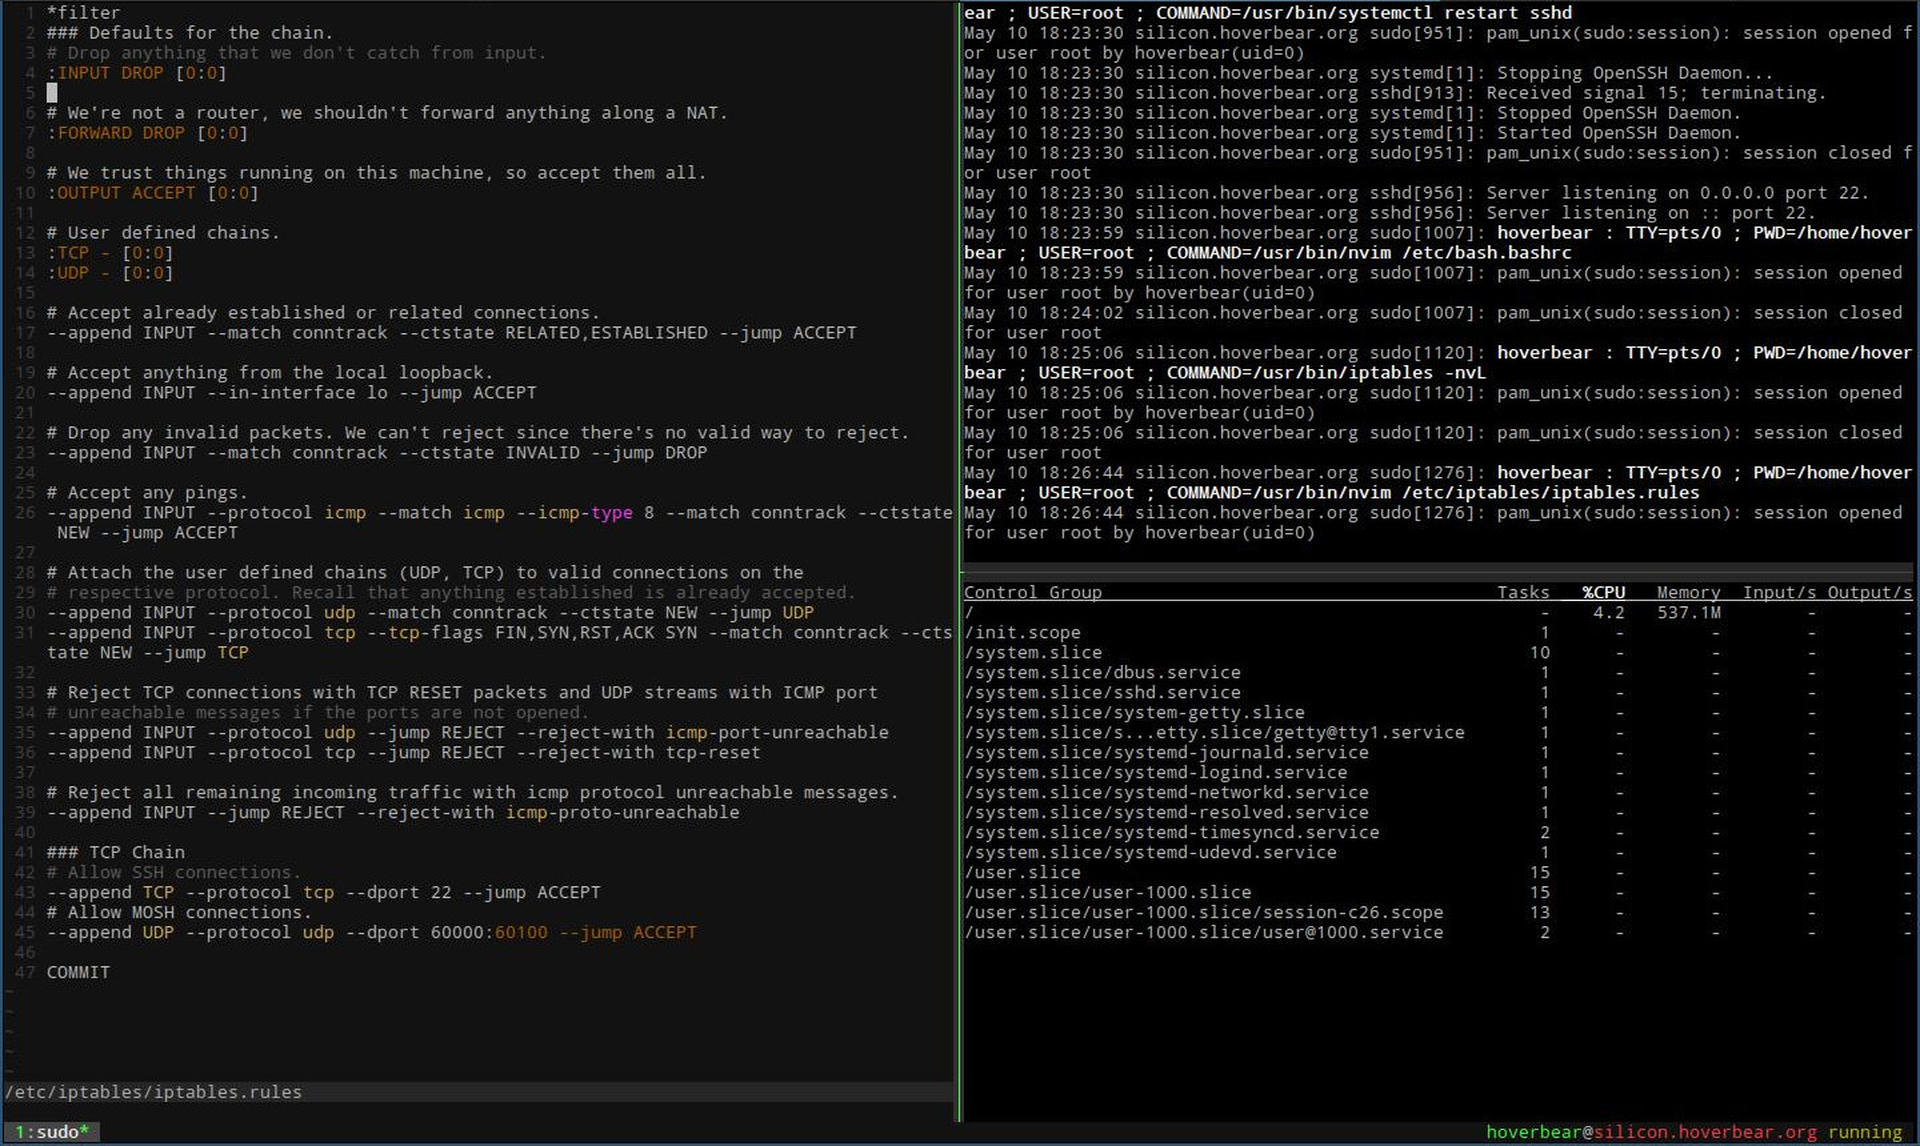
What's perhaps most important to remember throughout this process is that you kept this system very clean. Next post we'll discuss using containers to construct virtual environments, which we can be much more messy with!