
This is the fifth part of an ongoing series on configuring a new server. In our last post we discussed and configured some basic tools. For all intensive purposes, our 'root' system is complete. What we'll be doing now is building the infrastructure to run containers the way we want to.
Before we get around to setting things up, let's describe the what we're up to.
Currently, the only external service the server is running is ssh. We'd like our server to host more services. These services are likely to be both internal services like databases, and external services like HTTP/HTTPS hosts. Since the IPv4 space is increasingly crowded we'd like to do all of these things from one IPv4 address too.
There are lots of ways to provide isolation to these services. These include virtual machines through something like Xen, containers through something like Docker, or even just chroots. Isolation isn't just for security, it's one way to help increase your security somewhat but it isn't a silver bullet. Light solutions like containers have very little overhead though so the benefits tend to outweigh the costs.
We'll use containers, because they're entertaining and fun to use. This is a laboratory, remember? We're suposed to have fun and play with new things.
Our First Container
We'll be using machinectl to work with our containers. You may already know Docker, CoreOS's rkt, or lxc, and you're more than welcome to use any of those. The important thing is to only use one on this machine. You don't want to be managing multiple container providers. Good news is they're all pretty much compatible with one another, so if you use machinectl you can still use Docker images.
To get started with our first container, we first need to construct one. We'll make a scratch directory and put it in there. We'll tell pacstrap, which came as part of arch-install-scripts, to ignore anything that's likely unnecessary in a container.
mkdir -p ~/scratch/
echo -e "n\nn\nn\nn\nn\nn\nn\nn\nn\nn\nn\nn\nn\nn\n\n" | sudo pacstrap -i -c -d ~/scratch/ base --ignore linux,linux-firmware,cryptsetup,jfsutils,lvm2,nano,netctl,reiserfsprogs,vi,xfsprogs,mdadm,device-mapper,licenses,man-pages,pcmciautils
This should give you an installed package size of under 400MB. That's pretty decent. We could probably go smaller but it doesn't really matter. We don't need to worry about setting up things like iptables since it's already protected via the host, and we don't need to have things like vi because we'll do our editing from outside of the container. We don't need things like linux because we're using the host kernel.
Take a look in ~/scratch and you should see what appears to be a base Arch install like we had before. We're going to use chroot to enable some services by default, finally we're going to import it into machinectl:
cd ~/scratch
cat <<EOF | sudo chroot .
    systemctl enable systemd-networkd
    systemctl enable systemd-resolved
    rm /etc/resolv.conf
    ln -s /run/systemd/resolve/resolv.conf /etc/resolv.conf
    sed -i -e 's/hosts: files dns myhostname/hosts: files mymachines resolve myhostname/g' /etc/nsswitch.conf
EOF
sudo tar --create --preserve-permissions --gzip * | sudo machinectl import-tar --read-only - base
After a second, this command will be done and we'll have our first image. machinectl list-images shows this:
NAME TYPE      RO  USAGE  CREATED                     MODIFIED
base subvolume yes 277.6M Wed 2016-05-11 15:52:43 PDT n/a

1 images listed.
We can test out the image with machinectl start base. If you get an "Operation not supported" error here it's because you updated your kernel and haven't restarted. Later we'll talk about kexec to help with this problem.
You can get a shell into the container with machinectl shell base. You'll probably notice there is no network connection. That's because our firewall is blocking us! You can check this by observing iptables -nvL and watching the packet counts go up on the icmp-port-unreachable filter.
Editing our /etc/iptables/iptables.rules we can add the green lines:
 # Accept anything from the local loopback.
 --append INPUT --in-interface lo --jump ACCEPT
+# Accept anything originating from a container.
+--append INPUT --in-interface ve-+ --jump ACCEPT
+--append FORWARD --in-interface ve-+ --jump ACCEPT
This rule will make it so any communications coming from our container adapters will be permitted accepted. Now reload the firewall with systemctl restart iptables.
Returning to your container with machinectl reboot base then machinectl shell base, from here you should be able to run ping hoverbear.org and ping silicon if silicon is your machine's hostname like mine.
You can check over your work by running btrfs subvolume list / and verifying that there is a var/lib/machines/base subvolume, then running machinectl list-images --all and verifying there is a base image.
From here you can create writable clones of the image with machinectl clone base $NAME, then start them, shell into them, and ultimately poweroff them. When you're ready to get rid of them entirely you can remove them.
Later on you can upgrade your base image in a similar way.
sudo machinectl clone base upgrade
sudo machinectl start upgrade
After a moment to start you can issue the upgrade command.
sudo machinectl shell upgrade /bin/pacman -- -Syu
sudo machinectl poweroff upgrade
After another moment you can finish up.
sudo machinectl remove base
sudo machinectl read-only upgrade
sudo machinectl rename upgrade base
Orcestration
At this point you might have identified a potential problem coming up. How do we create and maintain all these gosh darn containers? Well, that's a great question! We're going to try using Puppet!
This is a very different strategy compared to that taken by Docker. Docker uses declarative Dockerfiles to build images, then you upgrade by either replacing the current running container, or executing commands via the run subcommand. With puppet we'll be able to easily execute pre-defined provisioning scripts and maintain our running containers.
Also, I want to learn Puppet, so this is a great excuse. You can review the Puppet docs as well as this guide by Digital Ocean. Our plan is a bit different than those.
Let's start by creating a puppet container from our base.
machinectl clone base puppetSince we're basing our puppet image on our base Arch image we can have them share repository caches. Neat! Next we'll create a environments subvolume on our BTRFS volume so we can mount it into the puppet image. This will help us not accidently delete things. We're 'in' a subvolume already so we need to actually mount the true root for this.
mount /dev/sda /mnt/
btrfs subvolume create /mnt/config/puppet
echo "/dev/sda    /config/puppet             btrfs   subvol=config/puppet,rw,relatime,ssd,space_cache,compress=lzo          0   0" >> /etc/fstab
mkdir -p /config/puppet
mount /config/puppet
We'll create /etc/systemd/nspawn/puppet.nspawn which is the container specific configuration.
mkdir -p /etc/systemd/nspawn/
cat <<EOF > /etc/systemd/nspawn/puppet.nspawn
[Files]
# Official packages are signed and verified before install
Bind=/var/cache/pacman
# abs packages are not.
BindReadOnly=/var/cache/abs
# Bind in our puppet configuration.
Bind=/config/puppet:/etc/puppetlabs
EOF
See anti-feature note in next section.
Now we can start the machine and hop inside.
sudo machinectl start puppet
sudo machinectl shell puppet
Inside of this container we can start seting up Puppet! First we'll install it:
pacman -Syu puppet --noconfirmBefore we start making manifests we need to get the server working though! In order to do this we need to edit our configuration file at /etc/puppetlabs/puppet/puppet.conf.
# In puppet container
cat <<EOF >> /etc/puppetlabs/puppet/puppet.conf
[main]
certname = puppet
bindaddress = ::
autosign = true
environment = production
runinterval = 1h
strict_variables = true
EOF
Next we'll make a simple .service file for puppet master since it doesn't come with one by default. You can run systemctl cat puppet to see the configuration of puppet agent. We'll basically just copy this.
cat <<EOF > /etc/systemd/system/puppetmaster.service
[Unit]
Description=Puppet master
Wants=basic.target
After=basic.target network.target

[Service]
EnvironmentFile=-/etc/sysconfig/puppetmaster
EnvironmentFile=-/etc/sysconfig/puppet
EnvironmentFile=-/etc/default/puppet
ExecStart=/usr/bin/puppet master $PUPPET_EXTRA_OPTS --no-daemonize
ExecReload=/bin/kill -HUP $MAINPID
KillMode=process

[Install]
WantedBy=multi-user.target
EOF
Now you can start it with systemctl start puppetmaster. At this point let's consider that our puppet container should probably be managed by Puppet as well! Let's do that to learn how to use Puppet, then we'll figure out networking.
mkdir -p /etc/puppetlabs/code/environments/production/manifests/
cat <<EOF > /etc/puppetlabs/code/environments/production/manifests/main.pp
node puppet,test {
    file { 'puppet-test':
        path    => '/puppet-test',
        ensure  => file,
        content => "Hello. Hallo.",
        owner   => 'root',
        mode    => '0644',
    }
}
EOF
Now you can run systemctl start puppet (this is the agent) and you might see that /puppet-test now exists. If not you might either need to wait a moment or restart puppet. This is due to the syncing behaivor which we can tame later.
Finally run systemctl enable puppet and systemctl enable puppetmaster. Remember that you can edit this configuration from outside the container by editing the things in /puppet on the our root.
All we need to do now is add Puppet to our base. First make it writable with machinectl read-only base false, start it, then shell in with machinectl shell base.
pacman -Syu puppet --noconfirm
systemctl enable puppet
Then poweroff it and mark it read only again with machinectl read-only base true. Now when we clone it the new containers will automatically run puppet.
Fixing an Anti-Feature
A note, if you machinectl remove $MACHINE systemd will, in rather user hostile manner, delete your /etc/systemd/nspawn/$MACHINE.nspawn file, with no output, no warning, or flag to disable this anti-feature.
So let's fix it! In fact, we can make our /etc/sytemd/network/ and /etc/systemd/nspawn folders both subvolumes for safe keeping. With config/puppetlabs/ also as subvolume our primary container configuration will be stored safely in subvolumes.
Reviewing btrfs subvolume list / you may notice that our machines have been creating subvolumes as they go. This is great. We can use these for snapshots later. We'll create a config/network and config/nspawn. Recall that we're 'in' a subvolume already so we need to actually mount the true root for this again.
mount /dev/sda /mnt/
btrfs subvolume create /mnt/config/network
btrfs subvolume create /mnt/config/nspawn
cat <<EOF >> /etc/fstab
/dev/sda    /config/nspawn      btrfs   subvol=config/nspawn,rw,relatime,ssd,space_cache,compress=lzo   0   0
/dev/sda    /config/network     btrfs   subvol=config/network,rw,relatime,ssd,space_cache,compress=lzo   0   0
# Read only so nothing gets deleted.
/dev/sda    /etc/systemd/nspawn btrfs   subvol=config/nspawn,ro,relatime,ssd,space_cache,compress=lzo   0   0
/dev/sda    /etc/systemd/network btrfs   subvol=config/network,ro,relatime,ssd,space_cache,compress=lzo   0   0
EOF
mkdir -p /config/nspawn
mkdir -p /config/network
mount /config/nspawn
mount /config/network
# Remount the folders.
cp -r /etc/systemd/nspawn/* /config/nspawn/ && rm -r /etc/systemd/nspawn/*
cp -r /etc/systemd/network/* /config/network/ && rm -r /etc/systemd/network/*
mount /etc/systemd/network
mount /etc/systemd/nspawn
Great. Try touch /etc/systemd/nspawn/web.puppet, you can't! Instead, you can touch /config/nspawn/web.puppet.
Inter-Container Networking
Right now if you start up base and try to ping puppet from it things it won't work. You can observe the differences in their IP addresses. Mine were 169.254.143.177/16 and 169.254.221.43/16 which are on different subnets. We need some what to bring them together.
I tried a few ways of doing this (actually spent 6 days trying different ideas) and ended up on this because it's the simplest and seems easiest to understand.
First we'll go ahead and create a bridge. A bridge will let us join all the containers together on a single network so they can resolve each others names. For now this is sufficient, though there is some documentation suggestion VLANs can be used to improve this system. Perhaps we'll explore that later.
On our 'root' host:
cat <<EOF > /config/network/br-internal.netdev
[NetDev]
Name=br-internal
Kind=bridge
Description=The internal network bridge.
EOF

cat <<EOF > /config/network/br-internal.network
[Match]
Name=br-internal

[Network]
Description=The internal network bridge.
DHCP=yes
EOF

machinectl read-only base false
cat <<EOF > /var/lib/machines/base/etc/systemd/network/internal.network
[Match]
Name=int-*

[Network]
Description=The internal network connecting containers.
DHCP=yes
EOF
machinectl read-only base true
Then run systemctl edit systemd-nspawn@ and enter the following:
[Service]
# Set up.
ExecStartPre=/bin/sh -c "ip link add int-$(echo %I | cut -c 1-11) type veth peer name con-$(echo %I | cut -c 1-11)"
ExecStartPre=/bin/sh -c "ip link set con-$(echo %I | cut -c 1-11) master br-internal"
ExecStartPre=/bin/sh -c "ip link set con-$(echo %I | cut -c 1-11) up"
# Do work
ExecStart=
ExecStart=/bin/sh -c "systemd-nspawn --quiet --keep-unit --boot --link-journal=try-guest --network-veth --network-interface=int-$(echo %I | cut -c 1-11) --settings=override --machine=%I"
# Tear down.
ExecStopPost=-/bin/sh -c "ip link delete con-$(echo %I | cut -c 1-11)"
Try issuing machinectl clone base test machinectl poweroff test puppet, machinectl start test puppet, then try running machinectl shell test and see if you can ping puppet. Finally make sure you can ping hoverbear.org. If all is well then we've had great success.
At this point if you start up both the puppet and test container you should find a /puppet-test file on both. You can verify things with systemctl status puppet.
The Upgrade Problem
Earlier you made have already run into this problem, but if we run pacman -Syu and the linux package on the 'root' container gets upgraded this can cause some problems for us in the long haul. This may manifest as "Operation Not Permitted" errors when using tools like ip, this is because the kernel is trying to access modules on the file system which no longer exist.
We can use a tool called kexec to quickly (and uncleanly) switch to the new kernel. On my server this takes about a third of the time compared to actually rebooting. It's important to note that this doesn't replace a reboot though, as it doesn't make efforts to clean up anything. Things may go funky, and you may still need to reboot.
We'll build a systemd unit for this then enable it like so:
pacman -S kexec-tools
cat <<EOF > /etc/systemd/system/kexec-load@.service
[Unit]
Description=Load %i as the kernel.
Documentation=man:kexec(8)
DefaultDependencies=no
Before=shutdown.target umount.target final.target

[Service]
Type=oneshot
ExecStart=/usr/bin/kexec -l /boot/vmlinuz-%i --initrd=/boot/initramfs-%i.img --reuse-cmdline

[Install]
WantedBy=kexec.target
EOF
systemctl enable kexec-load@linux
Now you can load into the newest kernel with systemctl kexec when you decide it's time. I'd suggest testing it now before moving on so you know it works! This also works great as a soft reboot.
The Web Proxy
Since we know we'd like to host be able to host multiple web services we'll need to set up a proxy to handle port 80, the default socket for httpd. Since only one program can bind to a given port at a time, its job will be to inspect the incoming traffic to observe the Server Name Indentification, or SNI, then route it to the appropriate container. By default this will be the web-$VARIABLE container, where the request is $VARIABLE.$DOMAIN.$TLD. We'll call the proxy itself web.
[network: example.hoverbear.org]->[web]->[web-example]Later we'll follow a similar scheme for db, usr, box, etc. You can use whichever scheme you'd like, or change later, just be consistent.
We'll start by editing our puppet configuration to define what this host should look like. Since we have the puppet configuration subvolume mounted on /puppet on our host we can just edit it from there.
mkdir -p /config/puppet/code/modules/web/files/
cat <<EOF > /config/puppet/code/modules/web/files/haproxy.cfg
global
    user haproxy
    group haproxy
    daemon

defaults
    timeout client 10s
    timeout server 10s
    timeout connect 10s

frontend unsecured
    bind *:80
    mode http
    log /dev/log local0 info
    # Wait for delay on HELO
    tcp-request inspect-delay 5s
    # Redirect
    redirect scheme https code 301

frontend secured
    bind *:443
    mode tcp
    option tcplog
    log /dev/log local0 info
    # Wait for delay on HELO
    tcp-request inspect-delay 5s
    tcp-request content accept if { req.ssl_hello_type 1 }
    # Figure out which backend (= container) to use
    use_backend silicon_host if { req_ssl_sni -i silicon.hoverbear.org }

backend silicon_host
    mode tcp
    option tcplog
    log /dev/log local0 info
    # Pass it along
    option ssl-hello-chk
    server web-silicon web-silicon:443 check
EOF
mkdir -p /config/puppet/code/environments/production/manifests/
cat <<EOF > /config/puppet/code/environments/production/manifests/main.pp
node web {
    file { 'haproxy.cfg':
        path    => '/etc/haproxy/haproxy.cfg',
        ensure  => file,
        source => 'puppet:///modules/web/haproxy.cfg',
        owner   => 'root',
        mode    => '0644',
    }
    package { 'haproxy':
        ensure => installed,
        before => File['haproxy.cfg'],
    }
    service { 'haproxy':
        ensure    => running,
        subscribe => File['haproxy.cfg'],
    }
}
EOF
We can set up the container to bind to our host ports 80 and 443.
cat <<EOF > /config/nspawn/web.nspawn
[Network]
Port=80
Port=443
EOF
Then add in our firewall rules to the /etc/iptables/iptables.rules file, and reboot iptables.
 # Allow SSH connections.
 --append TCP --protocol tcp --dport 22 --jump ACCEPT
 # Allow HTTP connections.
+--append TCP --protocol tcp --dport 80 --jump ACCEPT
 # Allow HTTPS connections.
+--append TCP --protocol tcp --dport 443 --jump ACCEPT
Finally we can create the machine:
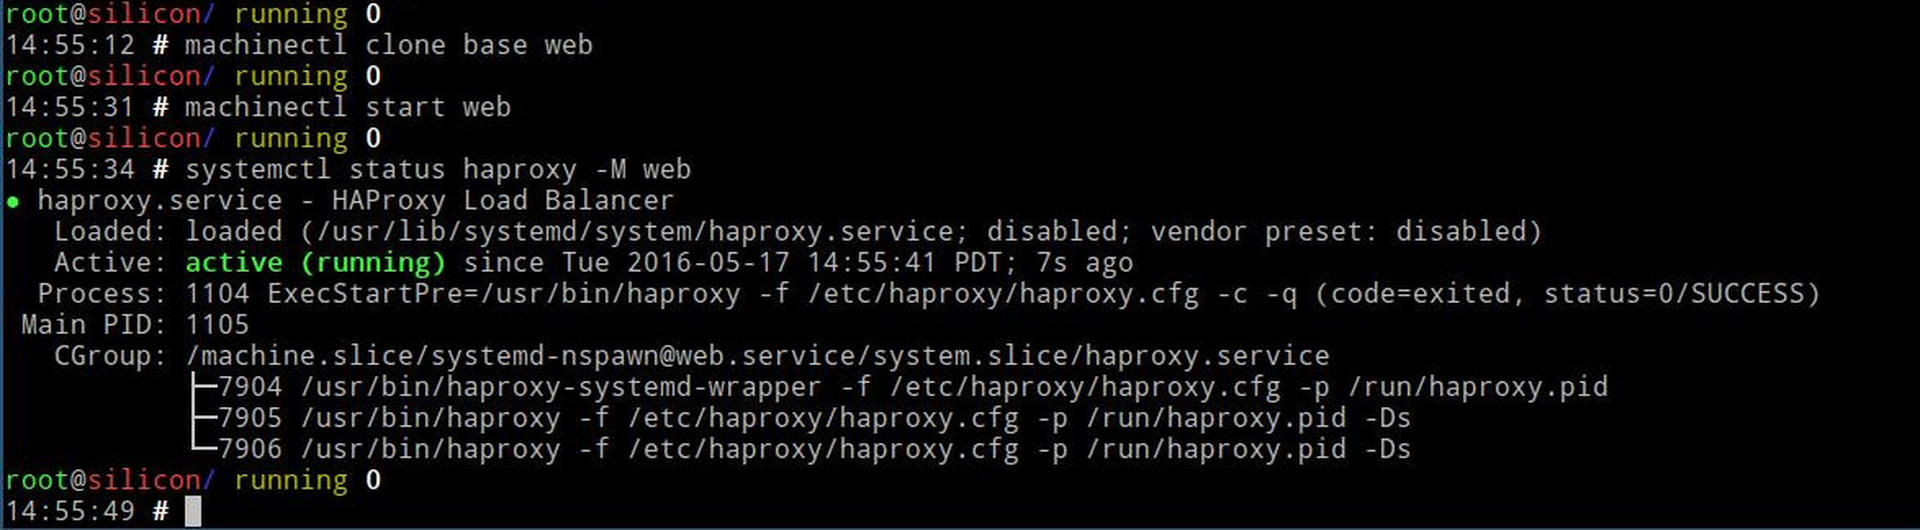
machinectl clone base web
machinectl start web
Give it a few seconds then try running systemctl status haproxy -M web.
Gotcha: Sometimes puppet doesn't wait for the name resolution to configure and needs to be restarted with systemctl restart puppet -M web. I'm currently pondering solutions to this.
Rest and Test
Since the hostname is silicon.hoverbear.org is already mapped in DNS for me, I'll use that for testing. You want to make your container web-$SUBDOMAIN.
machinectl clone base web-silicon
machinectl start web-silicon
Since we're testing we don't need to be clean at all. Just shell in, pacman -Syu nginx openssl and edit the /etc/nginx/nginx.conf on that container according to this diff:
-listen       80;
+listen       [::]:443 ssl;
+ssl_certificate /etc/nginx/ssl/nginx.crt;
+ssl_certificate_key /etc/nginx/ssl/nginx.key;
Then generate the certificate with:
mkdir -p /etc/nginx/ssl
openssl req -x509 -nodes -days 365 -newkey rsa:2048 -keyout /etc/nginx/ssl/nginx.key -out /etc/nginx/ssl/nginx.crt
Then start up the nginx service on that container. Verify you can curl web-silicon from both the container itself and your web container. You can check systemctl status -M web-silicon nginx and systemctl status -M web haproxy for any messages.
With any luck, you'll see the nginx default web page.
If all is good you can make these machines default to running with machinectl enable web puppet. In our next post we'll get around to setting more refined web service. Remember, web-silicon was just a hello world.
System Evolution
Over time our system will inevitably change, grow, and decay. We've been spending time to make sure that whatever happens we'll have the tools to keep going. We haven't gone out of our way to over-engineer anything so far, we've just made what we need with a few sharp tools.
As we keep moving ahead we'll discover more needs and eventually build up our services to be better and stronger as a whole, but for now we have the basis to start our work. nspawn containers are persistent, but we can remove them whenever we want and re-create them with a new configuration. Our Puppet master will re-configure new images the same as old ones, and what we extend out with that can be retroactively applied to all. The key is for us to maintain a persisting copy of the data necessary in a safe space. BTRFS and the Bind= option of nspawn enable this.
In our next post we'll explore how to deploy a basic folder based nginx host and the RustFestEU Call for Papers site. Then, it'll go live! Whoa! But first, let's take a break. That post was so long!